An important part of product development is prototyping. For microfluidic consumables / point of care tests it is no different. There are many processes available to transfer what you have on paper (or in the computer) into a polymer or hybrid prototype. However, the overall prototyping process you select can have a strong influence on the remaining journey towards a fully developed product in production.
How can you as an engineer select the right process early on in your microfluidic point of care test development? And how do you make sure you mitigate risks early on and achieve a prototype that is representative of the final product?
In this article, we would like to take a look at common processes used for prototyping and guide you in selecting the right one for you.
All kinds of Prototypes
There is room for interpretation of what is called a prototype. To take a closer look at the prototyping stage we differentiate in three main maturity levels.
1. Maturity Level - Lab setup
Starting with a feasibility prototype is common. This early stage is used to check the individual functionalities of the product in development. This can be done with a lab setup consisting of all kinds of equipment connected together.
As an engineer your focus in this stage is
- Proving the feasibility and the concept of the assay in practice and on a lab scale
- Testing critical features and functional challenges
Some of the required functionalities are often not yet translated into a feature on a chip. Functional challenges for the first prototypes are for example
- Microfluidic design
- Capillary flow
- Reagent storage
- Fluid manipulation like valving, pumping
- Interfacing and sealing
2. Maturity Level - Integrated Proof of Concept
In the next step we are going slowly from the lab environment towards something that might look already much more like a microfluidic product. Here, the theoretic plan and concept are bundled with the results from the lab set up. Now it’s time to start integrating the functional microfluidic modules into one prototype.
As an engineer your focus in this stage is to:
- Prove Key functionalities in relevant materials
- Integrate key functionalities and make them work together
3. Maturity Level - Product Prototype
We are now getting closer to the final product.
The functionalities and materials decided are on and proven and the design is in the last fine tuning stage. Now it’s time to focus is now on making the entire “system” and processes robust and documented and making sure it always works.
Focus during this phase:
- Freeze design and processes
- Create first parts for validation and verification
Many remaining details have to be finalized and documented in this phase. The transfer of your point of care test into production is about to happen.
These maturity phases play a role in selecting the best route forward with regards to prototyping. Read on to learn more about prototyping technologies and their characteristics.
Prototyping Technologies
The next step you want to take during your development journey is highly dependent on the maturity stage of your current setup or device. But also your application and what you need in regards to quality characteristics and amount of parts you need plays an important role. Let’s have a look at various prototyping technologies and the selection criteria for them.
When we look at the existing and commonly used prototyping processes we see:
- PMDS casting
- 3d printing
- Direct milling in polymer plaques
- Hot embossing
- injection moulding
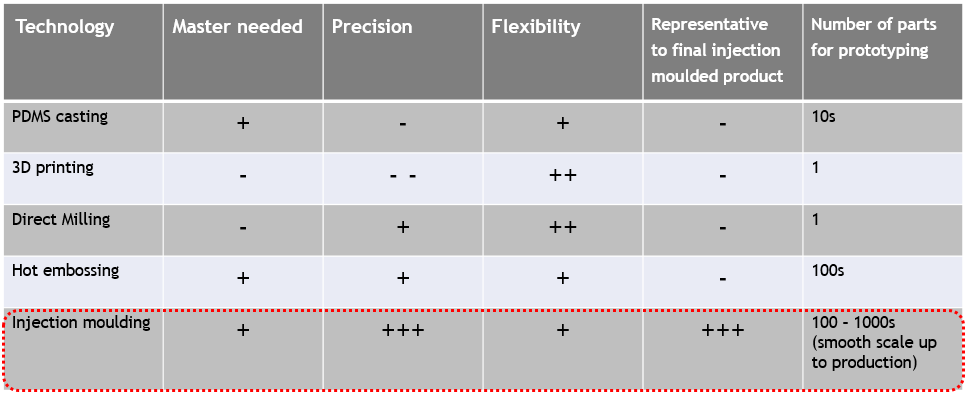
Image: Common prototyping technologies for microfluidic polymer products
To pick the right method for your product journey you have to consider:
- maturity level of the current setup or prototype
- Materials / surfaces / critical features / design of the product
- The amount of parts you will need to validate
Which technology to use at which stage?
PDMS casting, 3D printing and direct milling can be relevant in the early stages of development to prove concept, feasibility and first functions. Material and surface properties might not be the same as in an injection moulded product. However for testing functional features in an early stage and only a few parts are needed these methods are quick and low cost.
When we start to go towards smaller series, hot embossing is an option. It can deliver precision and the amount of parts you can create is higher. However with increasing volumes it is reaching its limitations. Also depending on the product it might not always be representative of the final injection moulded product. This can be due to the compatibility with different materials for some of the technologies used for prototyping and as well as different surface, design or optical properties of the resulting parts.
The stretch from your final prototype to your serial component should be a small as possible in order to guarantee a fast and reliable transfer to serial production and to mitigate risks from the beginning. Injection moulded prototypes are an option to do so. There are some misconceptions around that technology for prototyping that we will address further on.
Injection Moulding as an option for prototyping
Is injection moulding a valid option for prototyping? What are the key aspects of injection moulding as a prototyping process and how can you use them to your advantage?
- Risk Mitigation
Make use of a representative technology from the beginning and avoid pitfalls. All design considerations for the final production method will be taken into account early on. This avoids detours and shortens the path to the final product. - Make use of available tools and inserts
Save time and budget and make use of available injection moulding tools and exchangeable insert. Depending on what’s needed soft or hard tool materials can be used there.
Like this the transfer into serial tooling is smooth and fast. - Work steel-safe
Plan and design the tooling in a way that modifying the tool later on to optimize the design - Multiplying designs
Make use of standard available tools and test multiple designs or the critical features on one injection moulding insert. This for testing functions, processes or design options - Representative to production Method
Make use of a prototyping process early on that resembles the process that is planned to be used for the final production of the consumables. This can have benefits. Physical, mechanical and chemical properties of the parts can be close to what you want to achieve and testing these parts will give you results that tell you more about the final product.
Injection moulding is a flexible process that can be used for prototyping when you have to mitigate risks early on and want to make sure the transfer from prototype to production will be smooth. Critical features can be tested in a relevant environment and results give information about the final product.
In the end the process you select will depend on where you are in your journey, the product and its use as well as what your goal is for your business case.
What's next?
See how you can save time and money creating your prototype.
The road to your product prototype can be overwhelming as there are many decisions that influence the steps you are going to take as well as the final product.